


Looking for an easy Halloween craft that won’t leave you cleaning up for the rest of the afternoon? Grab a few rocks and some paint!
These easy Halloween rock painting ideas for kids are filled with pumpkins, ghosts, monsters, cats, and other spooky-cute characters that are simple enough for beginner rock painters.

This post may contain affiliate links. Please read my disclosure for more info.
Rock painting has always been one of those crafts my boys and I could enjoy together. Kids don’t need perfect brush skills or complicated patterns to make something they are proud of. Fingerprints become silly monsters, an orange rock turns into a jack-o’-lantern, and a few simple lines can transform a black rock into a Halloween cat.
That’s half the fun. There really is no wrong way to paint a Halloween rock!
These projects are perfect for an afternoon at home, classroom Halloween crafts, family craft nights, or a Halloween painting party.
If you want even more spooky inspiration after trying these easy designs, check out my 31+ Halloween Rock Painting Ideas.
Supplies for Painting Halloween Rocks With Kids
You don’t need a huge collection of art supplies to get started. Use what you already have and let the kids get creative.
Here are some of my favorite basic supplies for Halloween rock painting:
- Smooth rocks
- Acrylic craft paint
- Small paintbrushes
- Acrylic paint pens
- Pencil
- Paper plate or paint palette
- Cup of water
- Paper towels
- Halloween stickers
- Googly eyes
- Glitter paint
- Glow-in-the-dark paint
- Clear rock sealer
Tip: You don’t need every item on this list for every project. A few rocks, some basic paint colors, and a black paint pen are enough to make several of the Halloween designs below.
If this is your first time painting rocks, visit my Beginner’s Guide to Rock Painting for more tips on paints, pens, sealers, and getting started.
How to Prepare Rocks for Painting
- Before the spooky fun begins, give your rocks a quick bath.
- Wash them with a little soap and water to remove dirt and dust. Rinse them well and allow them to dry completely before painting.
- Once the rocks are clean and dry, it’s painting time!
1. Halloween Fingerprint Monster Rocks
Fingerprint rocks are one of my favorite Halloween crafts for younger kids because there is no complicated drawing involved.
A thumbprint can become a ghost, pumpkin, monster, spider, or strange little creature that your child invents on the spot. The sillier they look, the better!

Difficulty: Super easy
Great for: Younger kids and beginners
Adult help: Sealing the finished rocks
How to Make Fingerprint Halloween Rocks
- Paint the rock with a base coat of white, black, orange, purple, or another Halloween color. Let the paint dry completely.
- Pour a small amount of paint onto a paper plate.
- Have your child lightly dip a thumb or fingertip into the paint.
- Press the finger onto the rock to make a fingerprint shape.
- Continue adding fingerprints until you have as many little Halloween characters as you want.
- Once the fingerprints are dry, use paint pens or a small detail brush to add eyes, mouths, teeth, arms, legs, or other silly details.
- Let everything dry completely before sealing.
My little guy used acrylic paint when we originally made our fingerprint rocks, and this is a great project for letting kids take the lead. You may be surprised by the funny little creatures they come up with!
Fun variation: Add tiny googly eyes instead of painting the eyes.
2. Easy Halloween Sticker Rocks
This might be the easiest Halloween rock painting project of the entire bunch.
If your kids love stickers, let them combine painting and stickers to make Halloween rocks with almost no drawing required.
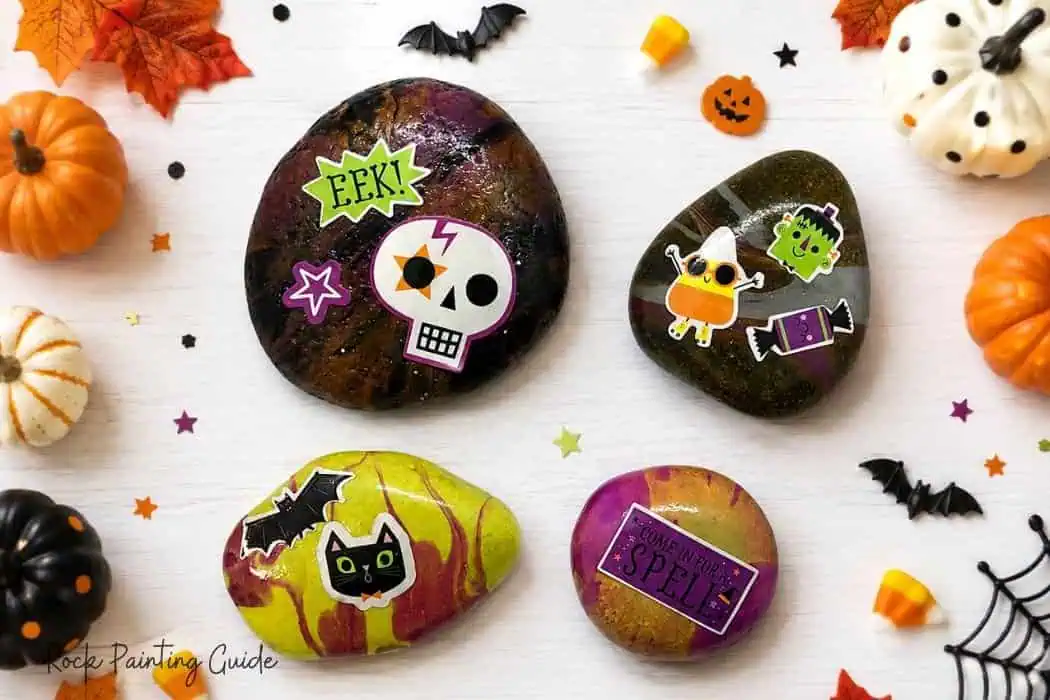
Difficulty: Very easy
Great for: Younger kids
Adult help: Sealing
How to Make Halloween Sticker Rocks
- Paint each rock with a Halloween-inspired background. Try orange, purple, black, green, or white.
- Let the paint dry completely.
- Add Halloween stickers to the painted surface.
- Press around the edges of each sticker so it lies as flat as possible.
- Add dots, stars, swirls, or other simple decorations with paint pens if desired.
- Allow everything to dry before sealing the finished rock.
You can also use leftover painted rocks from another craft. Paint-poured rocks make especially fun backgrounds because every one looks different.
Kid-friendly tip: Set out several colors of painted rocks along with a bowl of Halloween stickers and let everyone design their own.
3. Easy Jack-o’-Lantern Painted Rocks
You can’t have Halloween without a few pumpkins!
Jack-o’-lantern rocks are perfect for beginner painters because the design is mostly simple shapes. Plus, every pumpkin face can look completely different.
Make them happy, surprised, silly, spooky, or missing a tooth.
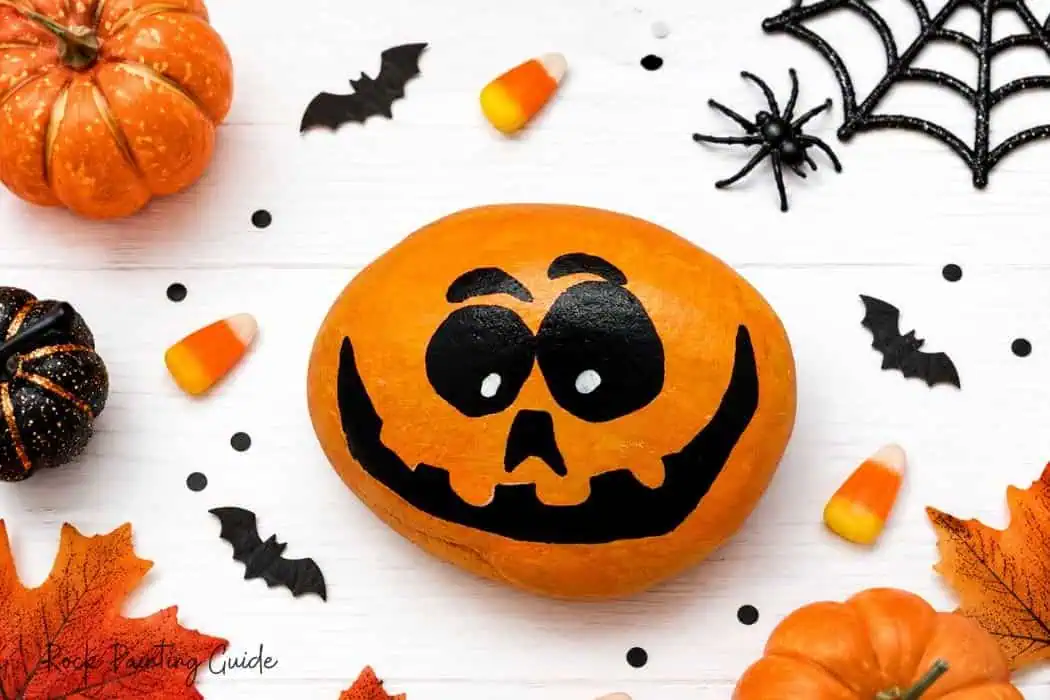
Difficulty: Easy
Great for: Kids and beginner rock painters
Adult help: Sealing
How to Paint a Jack-o’-Lantern Rock
- Paint the entire rock orange. Add a second coat if needed and let it dry.
- Lightly sketch two eyes, a nose, and a mouth with a pencil.
- Fill in the facial features with a black paint pen or small paintbrush.
- Add a small green stem or leaf near the top if the shape of your rock allows.
- Add tiny white highlights to the eyes for a cute cartoon look.
- Let the paint dry completely before sealing.
For younger kids, skip the pencil altogether. Let them paint the pumpkin faces however they want. Crooked smiles and mismatched eyes give these rocks even more personality.
4. Frankenstein Painted Rock
Frankenstein is one of those Halloween characters that looks impressive but can actually be broken down into very simple shapes.
My oldest son created the Frankenstein rock in the original version of this post, and it has always been one of my favorite kid-created Halloween rocks.

Difficulty: Easy to moderate
Great for: Older kids and beginner painters
Adult help: Sealing
How to Paint a Frankenstein Rock
- Paint the front of the rock green and allow it to dry.
- Use a pencil to lightly sketch Frankenstein’s hair, eyes, nose, and mouth.
- Fill in the hair with black paint.
- Use a black paint pen to outline the eyes, eyebrows, mouth, scars, and other facial features.
- Add white to the eyes and teeth.
- Paint small silver or gray bolts on the sides of his face.
- Add a few stitches or a crooked smile for extra personality.
- Let the paint dry completely before sealing.
Don’t worry about making both sides of the face match perfectly. Frankenstein should look a little wonky!
5. Easy Halloween Black Cat Rock
A spooky black cat is another fun Halloween rock idea, especially for kids who love to draw.
The original version of this project used tracing paper, but you can make it much easier by using simple shapes instead.

Difficulty: Easy to moderate
Great for: Kids who enjoy drawing
Adult help: Sealing
How to Paint a Black Cat Rock
- Paint the rock black and allow it to dry completely.
- Use a white or silver paint pen to draw a simple cat face or cat outline.
- Add two triangle-shaped ears.
- Paint two large orange, yellow, or green eyes.
- Add a small nose, whiskers, and a curved mouth.
- Decorate the background with stars, dots, a moon, or a little glitter paint.
- Let the finished rock dry before sealing.
If drawing the entire cat feels tricky, make just the cat’s face. Two ears, glowing eyes, a nose, and whiskers are enough to make the design instantly recognizable.
6. Easy Witch Hat Painted Rock
My son was introduced to Zentangle-style art at school, and we originally decorated our witch hat rock with lots of detailed doodle patterns.
For younger kids, though, you can simplify the same idea.

Difficulty: Easy to moderate
Great for: Kids who love doodling
Adult help: Sealing
How to Paint a Witch Hat Rock
- Paint the rock black, purple, or another dark Halloween color.
- Once dry, use a white colored pencil or paint pen to sketch a simple witch hat.
- Fill in the hat with purple, green, silver, or another bright color.
- Add a black band around the hat.
- Decorate the hat with dots, stripes, swirls, stars, spiderwebs, or other doodles.
- Add a little glitter paint if your child wants some Halloween sparkle.
- Let the finished design dry completely before sealing.
There are no rules for the patterns. That’s what makes this one so much fun. Fill every section with a different doodle and see where the design takes you.
7. Funny Gravestone Painted Rock
This silly gravestone painted rock adds a little humor to your Halloween rock collection. Instead of a spooky epitaph, kids can make up their own funny saying, joke, or ridiculous reason why the character ended up on the gravestone. It is an easy project that lets older kids get creative with both painting and writing.

Difficulty: Easy
Great for: Older kids and beginner rock painters
Adult help: Sealing
How to Paint a Gravestone Rock
- Choose a smooth, oval or rounded rock that resembles the shape of a gravestone.
- Paint the entire rock gray and allow it to dry completely. Add a second coat if needed.
- Use a pencil to lightly plan where the words will go before adding them permanently.
- Write a funny Halloween epitaph using a black paint pen or fine-tip acrylic marker.
- Add R.I.P. near the bottom to finish the gravestone look.
- Let the lettering dry completely before sealing the rock.
Our gravestone says, “Here lies good old Fred. A great big rock fell on his head. R.I.P.” Kids can copy this silly rhyme or invent their own funny gravestone message.
Fun variation: Add cracks, tiny spiderwebs, moss, a little ghost, or painted grass around the bottom to make the gravestone even more Halloween-ready.
8. Creepy Eyes Painted Rock
This creepy eyes painted rock is one of the easiest Halloween designs to make, but it still has a big spooky effect. With just a black background and a pair of glowing orange eyes, kids can create a rock that looks mysterious, silly, or just a little bit eerie.
It is a great choice when you want a quick Halloween rock that does not require a lot of detailed painting.
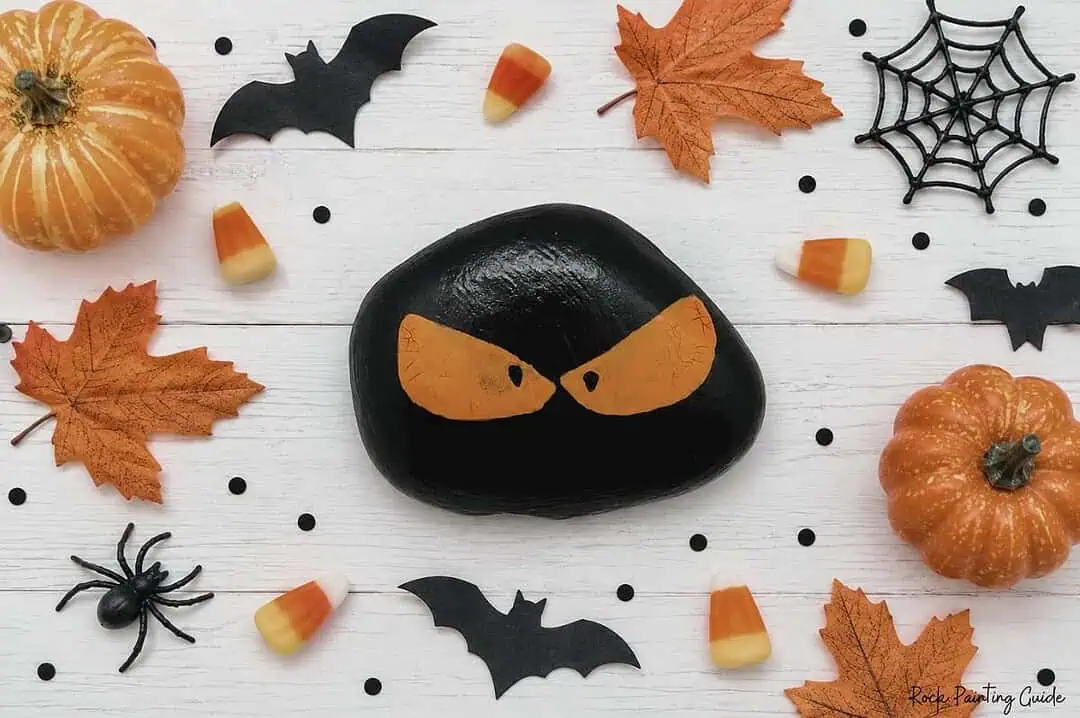
Difficulty: Super easy
Great for: Kids and beginner rock painters
Adult help: Sealing
How to Paint a Creepy Eyes Rock
- Choose a smooth rock with a wide front surface.
- Paint the entire rock black and let it dry completely.
- Add a second coat of black paint if needed for full coverage.
- Use a pencil to lightly sketch two large slanted eye shapes.
- Paint the eyes orange and allow them to dry.
- Add small black pupils near the center of each eye.
- If desired, use a thin paint pen or detail brush to add tiny crack lines or texture marks around the eyes for a more eerie look.
- Let the rock dry completely before sealing.
This is a fun Halloween project because kids can change the eye shape to create different expressions. Make them wide and goofy, narrow and sneaky, or extra sharp for a more spooky look.
Fun variation: Try yellow, green, or red eyes instead of orange for a different creepy effect.
Fun Extras to Add to Halloween Painted Rocks
Once kids get started, they usually want to keep decorating.
Set out a few extra craft supplies and let them experiment.
Try adding:
- Googly eyes
- Glitter
- Glow-in-the-dark paint
- Halloween stickers
- Pom-poms
- Metallic paint pens
- Stars and moons
- Polka dots
- Spiderwebs
- Tiny painted bats
- Funny faces
You can also create a Halloween rock painting station by putting paints, pens, stickers, and decorations in small containers and letting each child choose their favorites.
Just expect things to get a little messy. That’s part of the fun!
Tips for Painting Halloween Rocks With Kids
Keep the designs simple
Kids don’t need complicated designs to create adorable Halloween rocks. Pumpkins, ghosts, candy corn, monsters, and simple faces are perfect places to start.
Paint the background first
A solid base coat can make the colors and details stand out better. Just make sure the background is completely dry before adding the design.
Let kids make the creative decisions
Your ghost does not need to look like their ghost.
Give them an idea and let them take it from there. Different colors, unusual faces, crooked teeth, and wild monster expressions make kid-painted rocks much more fun.
Use paint pens for little details
Paint pens can make eyes, smiles, whiskers, stitches, dots, and other small details easier than using a tiny paintbrush.
Don’t rush the drying time
Let each layer dry before adding another color. Otherwise, you may end up with one big muddy Halloween monster, and not necessarily the kind you were trying to make!
Let adults handle spray sealers
If you’re using a spray sealer, an adult should apply it outdoors according to the directions on the product. Another option is using a child-appropriate brush-on sealer once the paint is completely dry.
What Can You Do With Halloween Painted Rocks?
Don’t let all those cute little monsters sit forgotten on the craft table.
Use your finished Halloween rocks to:
- Decorate a Halloween table
- Fill a decorative bowl
- Add them to your fall porch decor
- Make Halloween story stones
- Use them for classroom activities
- Give them to friends or neighbors
- Create a Halloween scavenger hunt
- Display them along a walkway or garden where appropriate
- Use them as party decorations
You could even paint one new rock every few days during October and build a little Halloween rock collection as the holiday gets closer.
Halloween Rock Painting FAQ
What paint is best for Halloween rocks?
Acrylic craft paint works well on rocks because it provides bright, opaque color and comes in lots of inexpensive shades. For younger children, washable tempera paint can be an easier-to-clean option. Always choose paints appropriate for your child’s age and follow the manufacturer’s instructions.
Can kids use acrylic paint on rocks?
Yes, children can use child-appropriate, non-toxic acrylic craft paints with adult supervision. Cover the work surface and wear old clothes because acrylic paint can stain once it dries.
Do painted rocks need to be sealed?
You don’t necessarily need to seal rocks that will only be displayed indoors. If the rocks will be handled often or placed outside, a sealer can help protect the artwork. Adults should handle spray sealers and use them outdoors according to the product directions.
What are the easiest Halloween characters to paint on rocks?
Ghosts, jack-o’-lanterns, candy corn, monsters, Frankenstein faces, and simple black cats are some of the easiest designs for beginners because they can be created with basic shapes and just a few colors.
Should I paint a base coat on my rocks first?
You don’t have to, but a base coat can make your colors look brighter and give you a smoother-looking background. White, black, orange, purple, and green are great base colors for Halloween projects.
More Easy Halloween Rock Painting Ideas
Once the kids have painted their pumpkins, monsters, ghosts, and candy corn, there’s no reason to stop there.
You could also try:
- Mummies
- Bats
- Spiders
- Skeletons
- Friendly vampires
- Witch faces
- Scarecrows
- Zombies
- Haunted houses
- Spiderwebs
For even more inspiration, head over to my Halloween Rock Painting Collection for plenty of spooky, cute, and creative designs.
Whether you’re painting rocks with your kids at the kitchen table, planning a classroom Halloween craft, or just looking for a fun way to spend a fall afternoon together, keep it simple and enjoy the process.
The best kid-painted rocks aren’t the ones with perfectly straight lines. They’re the ones with silly faces, unexpected colors, and a little personality from the artist who made them.
Grab some rocks, break out the paint, and have a spooky-good time creating your own Halloween rock collection.
Happy Haunting!

These are fabulous, thank you for sharing. I really love the finger painting ideas.